¶Pendahuluan
Pada artikel kali ini, kita akan sama - sama membuat sebuah module product yang kita bagi menjadi beberapa langkah diatanya sebagai berikut :
- Membuat Component Index
- Membuat Component Create
- Membuat Component Edit
setiap langkah diatas, nanti-nya akan kita buat menggunakan component laravel livewire.
¶Component Product Index
Silahkan teman-teman buka terminal-nya, kemudian jalankan perintah berikut ini :
Terminal
php artisan make:livewire pages.products.index
Setelah berhasil menjalankan perintah diatas, kita akan mendapatkan 2 buah file baru yang terletak di :
-
app/Livewire/Pages/Products/Index.php
-
resources/views/livewire/pages/products/index.blade.php
Silahkan teman-teman buka file App/Livewire/Pages/Products/Index.php, kemudian tambahkan kode berikut ini :
Products/Index.php
<?php

namespace App\Livewire\Pages\Products;

use App\Models\Product;
use Livewire\Component;
use Livewire\Attributes\Url;
use Livewire\WithPagination;
use Livewire\Attributes\Title;
use Livewire\Attributes\Layout;
use Illuminate\Support\Facades\Storage;

class Index extends Component
{
    use WithPagination;

    // define layout
    #[Layout('layouts.app')]
    // define title
    #[Title('Products')]

    // define proprty
    #[Url]
    public $search;
    public $path = 'public/products/';

    // define function delete
    public function delete($id)
    {
        // get product data by id
        $product = Product::findOrFail($id);

        // delete product image
        Storage::disk('local')->delete($this->path.basename($product->image));

        // delete product data
        $product->delete();
    }

    public function render()
    {
        // table heads
        $table_heads = ['No', 'Name', 'Image', 'Category', 'Price', 'Qty', 'Action'];

        // list products data
        $products = Product::query()
            ->with('category')
            ->when($this->search, function($query){
                $query->whereAny(['name', 'price'], 'like', '%'. $this->search .'%')
                    ->orWhereHas('category', function($query){
                        $query->where('name', 'like', '%'. $this->search .'%');
                    });
            })
            ->latest()
            ->paginate(7);

        // render view
        return view('livewire.pages.products.index', compact('table_heads', 'products'));
    }
}
Pada kode diatas pertama - tama, kita menggunakan sebuah trait yang telah disedikan oleh livewire.
Products/Index.php
use WithPagination;
Selanjutnya kita mendefinisikan sebuah attribute title dan layout.
Products/Index.php
// define layout
#[Layout('layouts.app')]
// define title
#[Title('Products')]
Kemudian kita juga mendefinisikan beberapa property diantaranya search dan path.
Products/Index.php
// define proprty
#[Url]
public $search;
public $path = 'public/products/';
Method Delete
Method ini kita gunakan untuk menghapus data product sesuai dengan parameter id yang kita kirimkan.
Products/Index.php
// define function delete
public function delete($id)
{
    // get product data by id
    $product = Product::findOrFail($id);

    // delete product image
    Storage::disk('local')->delete($this->path.basename($product->image));

    // delete product data
    $product->delete();
}
Didalam method tersebut, pertama -tama kita mencari data product yang sesuai berdasarkan paramater id yang dikirimkan.
Products/Index.php
// get product data by id
$product = Product::findOrFail($id);
Setelah data berhasil ditemukan, maka kita lanjutkan untuk menghapus gambar product.
Products/Index.php
// delete product image
Storage::disk('local')->delete($this->path.basename($product->image));
Kemudian, kita juga menghapus seluruh data product yang ada sesuai dengan paramater id yang dikirimkan.
Products/Index.php
// delete product data
$product->delete();
Method Render
Method ini kita gunakan untuk menampilkan data product yang kita miliki didalam database.
Products/Index.php
public function render()
{
    // table heads
    $table_heads = ['No', 'Name', 'Image', 'Category', 'Price', 'Qty', 'Action'];

    // list products data
    $products = Product::query()
        ->with('category')
        ->when($this->search, function($query){
            $query->whereAny(['name', 'price'], 'like', '%'. $this->search .'%')
                ->orWhereHas('category', function($query){
                    $query->where('name', 'like', '%'. $this->search .'%');
                });
        })
        ->latest()
        ->paginate(7);

    // render view
    return view('livewire.pages.products.index', compact('table_heads', 'products'));
}
Pada kode diatas, pertama - tama kita mendefinisikan sebuah variabel baru dengan nama table_heads .
Products/Index.php
// table heads
$table_heads = ['No', 'Name', 'Image', 'Category', 'Price', 'Qty', 'Action'];
Selanjutnya kita membuat sebuah variabel baru dengan nama products yang dimana, variabel tersebut menampung seluruh data product yang kita miliki, disini kita juga melakukan filtering data sesuai dengan value dari property search, method latest kita gunakan untuk menampilkan urutan data paling baru dan kita buat pembatasan data yang ditampilkan hanya sebanyak 7 data menggunakan method paginate.
Products/Index.php
// list products data
$products = Product::query()
  ->with('category')
  ->when($this->search, function($query){
      $query->whereAny(['name', 'price'], 'like', '%'. $this->search .'%')
          ->orWhereHas('category', function($query){
              $query->where('name', 'like', '%'. $this->search .'%');
          });
  })
  ->latest()
  ->paginate(7);
Kemudian, data products tersebut kita lempar kedalam view dengan cara menggunakan sebuah method compact, agar data tersebut bisa kita gunakan didalam view.
Products/Index.php
// render view
return view('livewire.pages.products.index', compact('table_heads', 'products'));
¶Route Component Product Index
Setelah berhasil membuat component product index, sekarang kita akan lanjutkan untuk membuat route-nya, Silahkan teman - teman buka file routes/web.php, kemudian tambahkan kode berikut ini :
web.php
<?php

use Illuminate\Support\Facades\Route;
use App\Livewire\Pages\Categories\Index as CategoryIndex;
use App\Livewire\Pages\Categories\Create as CategoryCreate;
use App\Livewire\Pages\Categories\Edit as CategoryEdit;
use App\Livewire\Pages\Products\Index as ProductIndex;


Route::view('/', 'welcome');

Route::group(['middleware' => ['auth']], function(){
    // categories route
    Route::group(['prefix' => 'categories', 'as' => 'categories.'], function(){
        Route::get('/', CategoryIndex::class)->name('index');
        Route::get('/create', CategoryCreate::class)->name('create');
        Route::get('/edit/{category}', CategoryEdit::class)->name('edit');
    });
    // products route
    Route::group(['prefix' => 'products', 'as' => 'products.'], function(){
        Route::get('/', ProductIndex::class)->name('index');
    });
});

Route::view('dashboard', 'dashboard')
    ->middleware(['auth', 'verified'])
    ->name('dashboard');

Route::view('profile', 'profile')
    ->middleware(['auth'])
    ->name('profile');

require __DIR__.'/auth.php';
Dari perubahan kode diatas, kita menambahkan sebuah route baru dengan nama products, untuk memastikan route yang kita buat berfungsi, teman - teman bisa jalankan perintah berikut ini dalam terminal.
Terminal
php artisan r:l --name=products
Setelah perintah artisan diatas berhasil dijalankan maka kita akan mendapatkan output, kurang lebih seperti berikut ini.
Terminal
GET|HEAD products .......................................... products.index › App\Livewire\Pages\Products\Index
¶Navigasi Component Product Index
Silahkan teman - teman buka file yang bernama navigation.blade.php yang terletak di folder resources/views/livewire/layout, kemudian ubah kodenya menjadi berikut ini :
navigation.blade.php
<?php

use App\Livewire\Actions\Logout;
use Livewire\Volt\Component;

new class extends Component
{
    /**
     * Log the current user out of the application.
     */
    public function logout(Logout $logout): void
    {
        $logout();

        $this->redirect('/', navigate: true);
    }
}; ?>

<nav x-data="{ open: false }" class="bg-white border-b border-gray-100">
    <!-- Primary Navigation Menu -->
    <div class="max-w-7xl mx-auto px-4 sm:px-6 lg:px-8">
        <div class="flex justify-between h-16">
            <div class="flex">
                <!-- Logo -->
                <div class="shrink-0 flex items-center">
                    <a href="{{ route('dashboard') }}" wire:navigate>
                        <x-application-logo class="block h-9 w-auto fill-current text-gray-800" />
                    </a>
                </div>

                <!-- Navigation Links -->
                <div class="hidden space-x-8 sm:-my-px sm:ms-10 sm:flex">
                    <x-nav-link :href="route('dashboard')" :active="request()->routeIs('dashboard')" wire:navigate>
                        {{ __('Dashboard') }}
                    </x-nav-link>
                    <x-nav-link :href="route('categories.index')" :active="request()->routeIs('categories*')" wire:navigate>
                        {{ __('Categories') }}
                    </x-nav-link>
                    <x-nav-link :href="route('products.index')" :active="request()->routeIs('products*')" wire:navigate>
                        {{ __('Products') }}
                    </x-nav-link>
                </div>
            </div>

            <!-- Settings Dropdown -->
            <div class="hidden sm:flex sm:items-center sm:ms-6">
                <x-dropdown align="right" width="48">
                    <x-slot name="trigger">
                        <button class="inline-flex items-center px-3 py-2 border border-transparent text-sm leading-4 font-medium rounded-md text-gray-500 bg-white hover:text-gray-700 focus:outline-none transition ease-in-out duration-150">
                            <div x-data="{{ json_encode(['name' => auth()->user()->name]) }}" x-text="name" x-on:profile-updated.window="name = $event.detail.name"></div>

                            <div class="ms-1">
                                <svg class="fill-current h-4 w-4" xmlns="http://www.w3.org/2000/svg" viewBox="0 0 20 20">
                                    <path fill-rule="evenodd" d="M5.293 7.293a1 1 0 011.414 0L10 10.586l3.293-3.293a1 1 0 111.414 1.414l-4 4a1 1 0 01-1.414 0l-4-4a1 1 0 010-1.414z" clip-rule="evenodd" />
                                </svg>
                            </div>
                        </button>
                    </x-slot>

                    <x-slot name="content">
                        <x-dropdown-link :href="route('categories.index')" wire:navigate>
                            {{ __('Categories') }}
                        </x-dropdown-link>
                        <x-dropdown-link :href="route('products.index')" wire:navigate>
                            {{ __('Products') }}
                        </x-dropdown-link>
                        <x-dropdown-link :href="route('profile')" wire:navigate>
                            {{ __('Profile') }}
                        </x-dropdown-link>

                        <!-- Authentication -->
                        <button wire:click="logout" class="w-full text-start">
                            <x-dropdown-link>
                                {{ __('Log Out') }}
                            </x-dropdown-link>
                        </button>
                    </x-slot>
                </x-dropdown>
            </div>

            <!-- Hamburger -->
            <div class="-me-2 flex items-center sm:hidden">
                <button @click="open = ! open" class="inline-flex items-center justify-center p-2 rounded-md text-gray-400 hover:text-gray-500 hover:bg-gray-100 focus:outline-none focus:bg-gray-100 focus:text-gray-500 transition duration-150 ease-in-out">
                    <svg class="h-6 w-6" stroke="currentColor" fill="none" viewBox="0 0 24 24">
                        <path :class="{'hidden': open, 'inline-flex': ! open }" class="inline-flex" stroke-linecap="round" stroke-linejoin="round" stroke-width="2" d="M4 6h16M4 12h16M4 18h16" />
                        <path :class="{'hidden': ! open, 'inline-flex': open }" class="hidden" stroke-linecap="round" stroke-linejoin="round" stroke-width="2" d="M6 18L18 6M6 6l12 12" />
                    </svg>
                </button>
            </div>
        </div>
    </div>

    <!-- Responsive Navigation Menu -->
    <div :class="{'block': open, 'hidden': ! open}" class="hidden sm:hidden">
        <div class="pt-2 pb-3 space-y-1">
            <x-responsive-nav-link :href="route('dashboard')" :active="request()->routeIs('dashboard')" wire:navigate>
                {{ __('Dashboard') }}
            </x-responsive-nav-link>
            <x-responsive-nav-link :href="route('categories.index')" :active="request()->routeIs('categories*')" wire:navigate>
                {{ __('Categories') }}
            </x-responsive-nav-link>
            <x-responsive-nav-link :href="route('products.index')" :active="request()->routeIs('products*')" wire:navigate>
                {{ __('Products') }}
            </x-responsive-nav-link>
        </div>

        <!-- Responsive Settings Options -->
        <div class="pt-4 pb-1 border-t border-gray-200">
            <div class="px-4">
                <div class="font-medium text-base text-gray-800" x-data="{{ json_encode(['name' => auth()->user()->name]) }}" x-text="name" x-on:profile-updated.window="name = $event.detail.name"></div>
                <div class="font-medium text-sm text-gray-500">{{ auth()->user()->email }}</div>
            </div>
            <x-responsive-nav-link :href="route('categories.index')" wire:navigate>
                {{ __('Categories') }}
            </x-responsive-nav-link>
            <x-responsive-nav-link :href="route('products.index')" wire:navigate>
                {{ __('Products') }}
            </x-responsive-nav-link>
            <div class="mt-3 space-y-1">
                <x-responsive-nav-link :href="route('profile')" wire:navigate>
                    {{ __('Profile') }}
                </x-responsive-nav-link>

                <!-- Authentication -->
                <button wire:click="logout" class="w-full text-start">
                    <x-responsive-nav-link>
                        {{ __('Log Out') }}
                    </x-responsive-nav-link>
                </button>
            </div>
        </div>
    </div>
</nav>
Pada kode diatas, kita menambahkan beberapa navigasi yang mengarah ke route products.index , dengan menggunakan, beberapa component yang telah disediakan oleh laravel yaitu :
-
<x-nav-link/>.
-
<x-dropdown-link/>.
-
<x-responsive-nav-link/>
¶View Component Product Index
Silahkan teman - teman buka file yang bernama index.blade.php yang terletak di dalam folder resources/views/livewire/pages/products, kemudian tambahkan kode berikut ini :
index.blade.php
<div>
    <x-slot name="header">
        <h2 class="font-semibold text-xl text-gray-800 leading-tight">
            {{ __('Products') }}
        </h2>
    </x-slot>

    <div class="py-12 px-4">
        <div class="max-w-7xl mx-auto sm:px-6 lg:px-8">
            <div class="mb-4 flex items-center justify-between gap-4">
                <x-button type="create" :href="route('products.create')">
                    <x-slot name="title">
                        <svg xmlns="http://www.w3.org/2000/svg" width="24" height="24" viewBox="0 0 24 24"
                            fill="none" stroke="currentColor" stroke-width="1.5" stroke-linecap="round"
                            stroke-linejoin="round"
                            class="icon icon-tabler icons-tabler-outline icon-tabler-circle-plus">
                            <path stroke="none" d="M0 0h24v24H0z" fill="none" />
                            <path d="M3 12a9 9 0 1 0 18 0a9 9 0 0 0 -18 0" />
                            <path d="M9 12h6" />
                            <path d="M12 9v6" />
                        </svg>
                        <span class="hidden md:block">Create New Product</span>
                    </x-slot>
                </x-button>
                <div class="w-full md:w-1/2">
                    <x-search placeholder="Search products by name, price, or category.."/>
                </div>
            </div>
            <x-table :heads="$table_heads" title="List Data Products">
                @forelse ($products as $key => $product)
                    <tr>
                        <td class="whitespace-nowrap px-6 py-2 text-gray-700 rounded-b-lg text-sm">
                            {{ $key + $products->firstItem() }}</td>
                        <td class="whitespace-nowrap px-6 py-2 text-gray-700 rounded-b-lg text-sm">
                            {{ $product->name }}
                        </td>
                        <td class="whitespace-nowrap px-6 py-2 text-gray-700 rounded-b-lg text-sm">
                            <img src="{{ $product->image }}" alt="{{ $product->name }}"
                                class="object-cover w-10 h-10 rounded-lg" />
                        </td>
                        <td class="whitespace-nowrap px-6 py-2 text-gray-700 rounded-b-lg text-sm">
                            {{ $product->category->name }}
                        </td>
                        <td class="whitespace-nowrap px-6 py-2 text-gray-700 rounded-b-lg text-sm">
                            <sup>Rp</sup> {{ number_format($product->price, 0) }}
                        </td>
                        <td class="whitespace-nowrap px-6 py-2 text-gray-700 rounded-b-lg text-sm">
                            {{ $product->quantity }}
                        </td>
                        <td class="whitespace-nowrap px-6 py-2 text-gray-700 rounded-b-lg text-sm">
                            <div class="flex items-center gap-2">
                                <x-button type="edit" title="Edit" :href="route('products.edit', $product->id)"/>
                                <x-button type="delete" title="Delete" id="delete({{ $product->id }})"/>
                            </div>
                        </td>
                    </tr>
                @empty
                    <tr>
                        <td colspan="7"
                            class="whitespace-nowrap px-6 py-2 text-rose-700 rounded-b-lg text-sm text-center">
                            Sorry, we couldn't find anything...
                        </td>
                    </tr>
                @endforelse
            </x-table>
            <div class="mt-4">
                {{ $products->links() }}
            </div>
        </div>
    </div>
</div>
Pada kode diatas, kita melakukan pemanggilan beberapa components yang telah kita buat sebelumnya diantaranya :
-
<x-button/> - props yang digunakan type, href dan title.
-
<x-search/> - props yang digunakan placeholder.
-
<x-table/> - props yang digunakan heads dan title.
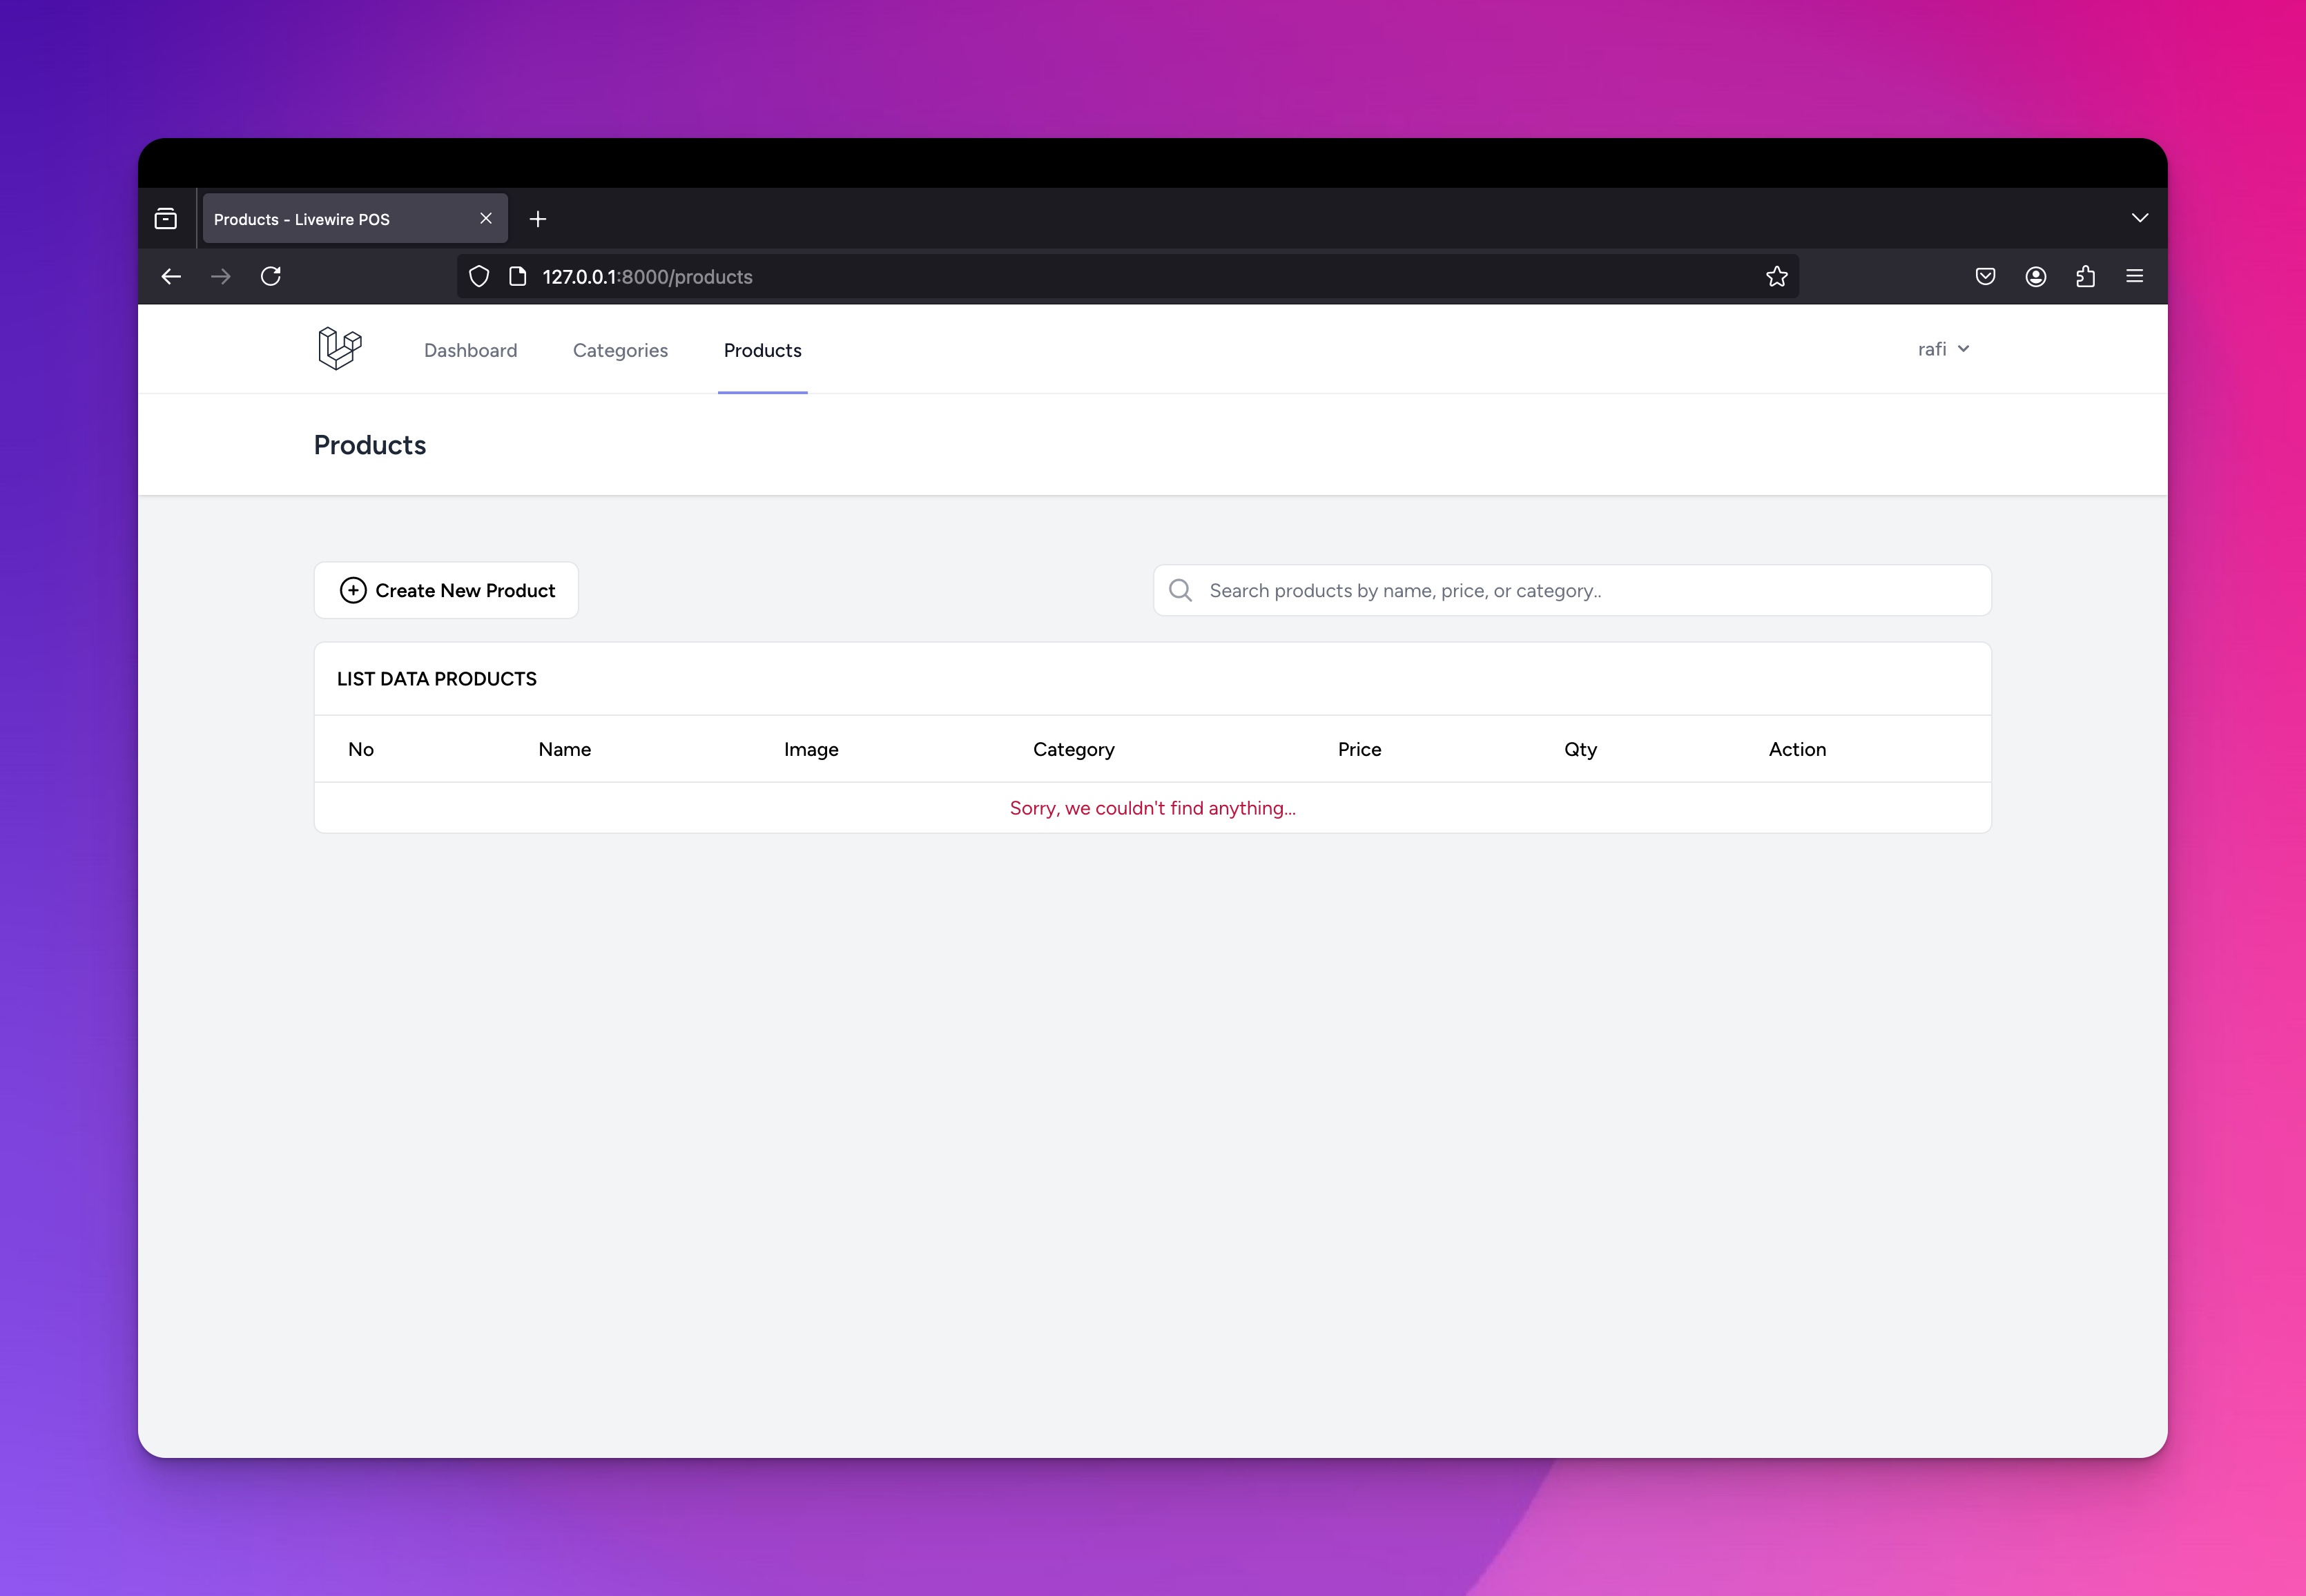
Untuk pencarian data, kita menggunakan component search yang kita buat sebelumnya, dengan kode kurang lebih seperti berikut ini :
search.blade.php
@props(['placeholder' => ''])

<div class="relative flex w-full flex-col gap-1 text-gray-400">
    <svg xmlns="http://www.w3.org/2000/svg" fill="none" viewBox="0 0 24 24" stroke-width="2" stroke="currentColor" aria-hidden="true" class="absolute left-2.5 top-1/2 size-5 -translate-y-1/2 text-gray-700/50">
        <path stroke-linecap="round" stroke-linejoin="round" d="m21 21-5.197-5.197m0 0A7.5 7.5 0 1 0 5.196 5.196a7.5 7.5 0 0 0 10.607 10.607Z" />
    </svg>
    <input
        type="test"
        class="w-full rounded-lg border border-gray-200 text-gray-700 py-2 px-4 pl-10 pr-2 text-sm focus:outline-none disabled:cursor-not-allowed disabled:opacity-750"
        wire:model.live="search"
        placeholder="{{ $placeholder }}"
        aria-label="search"
    />
</div>
Pada kode daitas, kita membuat sebuah element input dengan attribute bawaan livewire wire:model.live dengan value search. Disini sehingga jika element input kita masukan kata kunci, dia akan langsung mencari data sesuai dengan property search yang telah kita definisikan di component product index.
Untuk paginate halaman, kita buat kurang lebih seperti berikut ini :
index.blade.php
<div class="mt-4">
  {{ $products->links() }}
</div>
Dan untuk menampilkan perulangan data kita menggunakan kode, kurang lebih seperti berikut ini :
index.blade.php
@forelse ($products as $key => $product)
  	// ....
@empty
  	// ....
@endforelse
Pada kode diatas, variabel products kita dapatkan dari passing data yang ada di component product index didalam method render().
¶Component Product Create
Setelah berhasil menampilkan data product, disini kita akan lanjutkan untuk membuat sebuah component untuk menghandle pembuatan data product baru. Silahkan teman-teman buka terminal-nya, kemudian jalankan perintah berikut ini :
Terminal
php artisan make:livewire pages.products.create
Setelah berhasil menjalankan perintah diatas, kita akan mendapatkan 2 buah file baru yang terletak di :
-
app/Livewire/Pages/Products/Create.php
-
resources/views/pages/products/create.blade.php
Silahkan teman-teman buka file App/Livewire/Pages/Products/Create.php, kemudian tambahkan kode berikut ini :
Products/Create.php
<?php

namespace App\Livewire\Pages\Products;

use App\Models\Product;
use Livewire\Component;
use App\Models\Category;
use Livewire\WithFileUploads;
use Livewire\Attributes\Layout;
use Livewire\Attributes\Title;

class Create extends Component
{
    use WithFileUploads;

    // define layout
    #[Layout('layouts.app')]
    // define title
    #[Title('Create Product')]

    // define property
    public $path = 'public/products/';
    public $name;
    public $image;
    public $categoryId;
    public $price;
    public $qty;

    // define validation
    public function rules()
    {
        return [
            'name' => 'required|string|min:3|max:255|unique:products',
            'price' => 'required',
            'categoryId' => 'required',
            'image' => 'required|image|max:2048',
            'qty' => 'required',
        ];
    }

    // define function save
    public function save()
    {
        // call validation
        $this->validate();

        // store image product
        $this->image->storeAs(path: $this->path, name: $this->image->hashName());

        // create new product data
        Product::create([
            'name' => $this->name,
            'slug' => str()->slug($this->name),
            'image' => $this->image->hashName(),
            'category_id' => $this->categoryId,
            'price' => $this->price,
            'quantity' => $this->qty,
        ]);

        // render view
        return $this->redirect('/products', navigate:true);
    }

    public function render()
    {
        // list categories data
        $categories = Category::query()
            ->select('id', 'name')
            ->orderBy('name')->get();

        // render view
        return view('livewire.pages.products.create', compact('categories'));
    }
}
Pada kode diatas pertama - tama, kita menggunakan sebuah trait yang telah disedikan oleh livewire, trait ini berfungsi sebagai upload file di livewire.
Products/Create.php
use WithFileUploads;
Selanjutnya kita mendefinisikan sebuah attribute title dan layout.
Products/Create.php
// define layout
#[Layout('layouts.app')]
// define title
#[Title('Create Product')]
Kemudian kita juga mendefinisikan beberapa property diantaranya path, name, image, categoryId, price dan qty.
Products/Create.php
// define property
public $path = 'public/products/';
public $name;
public $image;
public $categoryId;
public $price;
public $qty;
Berikutnya kita juga mendefinisikan sebuah validasi, menggunakan method rules.
Products/Create.php
// define validation
public function rules()
{
    return [
        'name' => 'required|string|min:3|max:255|unique:products',
        'price' => 'required',
        'categoryId' => 'required',
        'image' => 'required|image|max:2048',
        'qty' => 'required',
    ];
}
Method Save
Method ini kita gunakan untuk melakukan proses penambahan data kedalam tabel products kita.
Products/Create.php
// define function save
public function save()
{
    // call validation
    $this->validate();

    // store image product
    $this->image->storeAs(path: $this->path, name: $this->image->hashName());

    // create new product data
    Product::create([
        'name' => $this->name,
        'slug' => str()->slug($this->name),
        'image' => $this->image->hashName(),
        'category_id' => $this->categoryId,
        'price' => $this->price,
        'quantity' => $this->qty,
    ]);

    // render view
    return $this->redirect('/products', navigate:true);
}
Didalam method tersebut, pertama - tama kita memangil validasi yang telah kita buat sebelumnya
Products/Create.php
// call validation
$this->validate();
Selanjutnya kita memanfaatkan method storeAs untuk menghandle proses penyimpanan data gambar kita.
Products/Create.php
// store image product
$this->image->storeAs(path: $this->path, name: $this->image->hashName());
Kemudian jika request yang kita kirimkan sudah sesuai dengan kriteria validasi yang kita definisikan, maka kita lakukan insert data baru kedalam tabel products menggunakan method create.
Products/Create.php
// create new product data
Product::create([
    'name' => $this->name,
    'slug' => str()->slug($this->name),
    'image' => $this->image->hashName(),
    'category_id' => $this->categoryId,
    'price' => $this->price,
    'quantity' => $this->qty,
]);
Terakhir kita akan diarahkan ke sebuah route yang bernama products.index, disini kita memanfaat redirect dari livewire navigate true yang artinya kita akan berpindah halaman tanpa melakukan reload page.
Products/Create.php
// render view
return $this->redirect('/products', navigate:true);
Method Render
Method ini kita gunakan untuk menampilkan sebuah halaman create data product.
Products/Create.php
public function render()
{
    // list categories data
    $categories = Category::query()
        ->select('id', 'name')
        ->orderBy('name')->get();

    // render view
    return view('livewire.pages.products.create', compact('categories'));
}
Pada kode diatas, kita menampilkan seluruh data category.
Products/Create.php
// list categories data
$categories = Category::query()
    ->select('id', 'name')
    ->orderBy('name')->get();
Selanjutnya kita lempar data category yang telah kita buat ke sebuah view dengan nama livewire.pages.products.create.
Products/Create.php
// render view
return view('livewire.pages.products.create', compact('categories'));
¶Route Component Product Create
Setelah berhasil membuat component product create, sekarang kita akan lanjutkan untuk membuat route-nya, Silahkan teman - teman buka file routes/web.php, kemudian tambahkan kode berikut ini :
web.php
<?php

use Illuminate\Support\Facades\Route;
use App\Livewire\Pages\Categories\Index as CategoryIndex;
use App\Livewire\Pages\Categories\Create as CategoryCreate;
use App\Livewire\Pages\Categories\Edit as CategoryEdit;
use App\Livewire\Pages\Products\Index as ProductIndex;
use App\Livewire\Pages\Products\Create as ProductCreate;


Route::view('/', 'welcome');

Route::group(['middleware' => ['auth']], function(){
    // categories route
    Route::group(['prefix' => 'categories', 'as' => 'categories.'], function(){
        Route::get('/', CategoryIndex::class)->name('index');
        Route::get('/create', CategoryCreate::class)->name('create');
        Route::get('/edit/{category}', CategoryEdit::class)->name('edit');
    });
    // products route
    Route::group(['prefix' => 'products', 'as' => 'products.'], function(){
        Route::get('/', ProductIndex::class)->name('index');
        Route::get('/create', ProductCreate::class)->name('create');
    });
});

Route::view('dashboard', 'dashboard')
    ->middleware(['auth', 'verified'])
    ->name('dashboard');

Route::view('profile', 'profile')
    ->middleware(['auth'])
    ->name('profile');

require __DIR__.'/auth.php';
Dari perubahan kode diatas, kita menambahkan sebuah route baru dengan nama products, untuk memastikan route yang kita buat berfungsi, teman - teman bisa jalankan perintah berikut ini dalam terminal.
Terminal
php artisan r:l --name=products
Setelah perintah artisan diatas berhasil dijalankan maka kita akan mendapatkan output, kurang lebih seperti berikut ini.
Terminal
GET|HEAD       products .......................................... products.index › App\Livewire\Pages\Products\Index
GET|HEAD       products/create ................................. products.create › App\Livewire\Pages\Products\Create
¶View Component Product Create
Setelah berhasil membuat route untuk penambahan data product, disini akan kita lanjutkan untuk pembuatan view tambah data product. silahkan teman - teman buka file yang bernama create.blade.php yang terletak di resources/views/livewire/pages/products, kemudian tambahkan kode berikut ini :
create.blade.php
<div>
    <x-slot name="header">
        <h2 class="font-semibold text-xl text-gray-800 leading-tight">
            {{ __('Create New Product') }}
        </h2>
    </x-slot>

    <div class="py-12 px-4">
        <div class="max-w-7xl mx-auto sm:px-6 lg:px-8">
            <x-card title="Create New Product">
                <form wire:submit.prevent="save">
                    <div class="mb-4">
                        <x-input type="text" label="Product Name" name="name" :value="old('name')" placeholder="Enter a product name..."/>
                    </div>
                    <div class="mb-4">
                        <x-input label="Product Image" type="file" name="image"/>
                    </div>
                    <div class="flex flex-col md:flex-row items-center gap-2 mb-4">
                        <div class="w-full md:w-1/2">
                            <x-select label="Product Category" name="categoryId">
                                    <option>Choose Category</option>
                                @foreach ($categories as $category)
                                    <option value="{{ $category->id }}">{{ $category->name }}</option>
                                @endforeach
                            </x-select>
                        </div>
                        <div class="w-full md:w-1/2">
                            <div class="flex flex-col md:flex-row items-center gap-2">
                                <div class="w-full md:w-1/2">
                                    <x-input type="number" label="Product Price" name="price" :value="old('price')" placeholder="Enter a product price..."/>
                                </div>
                                <div class="w-full md:w-1/2">
                                    <x-input type="number" label="Product Qty" name="qty" :value="old('qty')" placeholder="Enter a product qty..."/>
                                </div>
                            </div>
                        </div>
                    </div>
                    <div class="flex items-center gap-2">
                        <x-button type="submit" title="Create Product"/>
                        <x-button type="cancel" title="Go Back" :href="route('products.index')"/>
                    </div>
                </form>
            </x-card>
        </div>
    </div>
</div>
Pada kode diatas, kita melakukan pemanggilan beberapa components yang telah kita buat sebelumnya diantaranya :
-
<x-card/> - props yang digunakan title
-
<x-button/> - props yang digunakan type, href dan title.
-
<x-input/> - props yang digunakan type, label, name, value dan placeholder.
-
<x-select/> - props yang digunakan label dan name.
Pada bagian form action kita menggunakan attribute yang disediakan oleh livewire yaitu wire:submit.prevent kemudian kita set valuenya dengan method save yang telah kita buat sebelumnya.
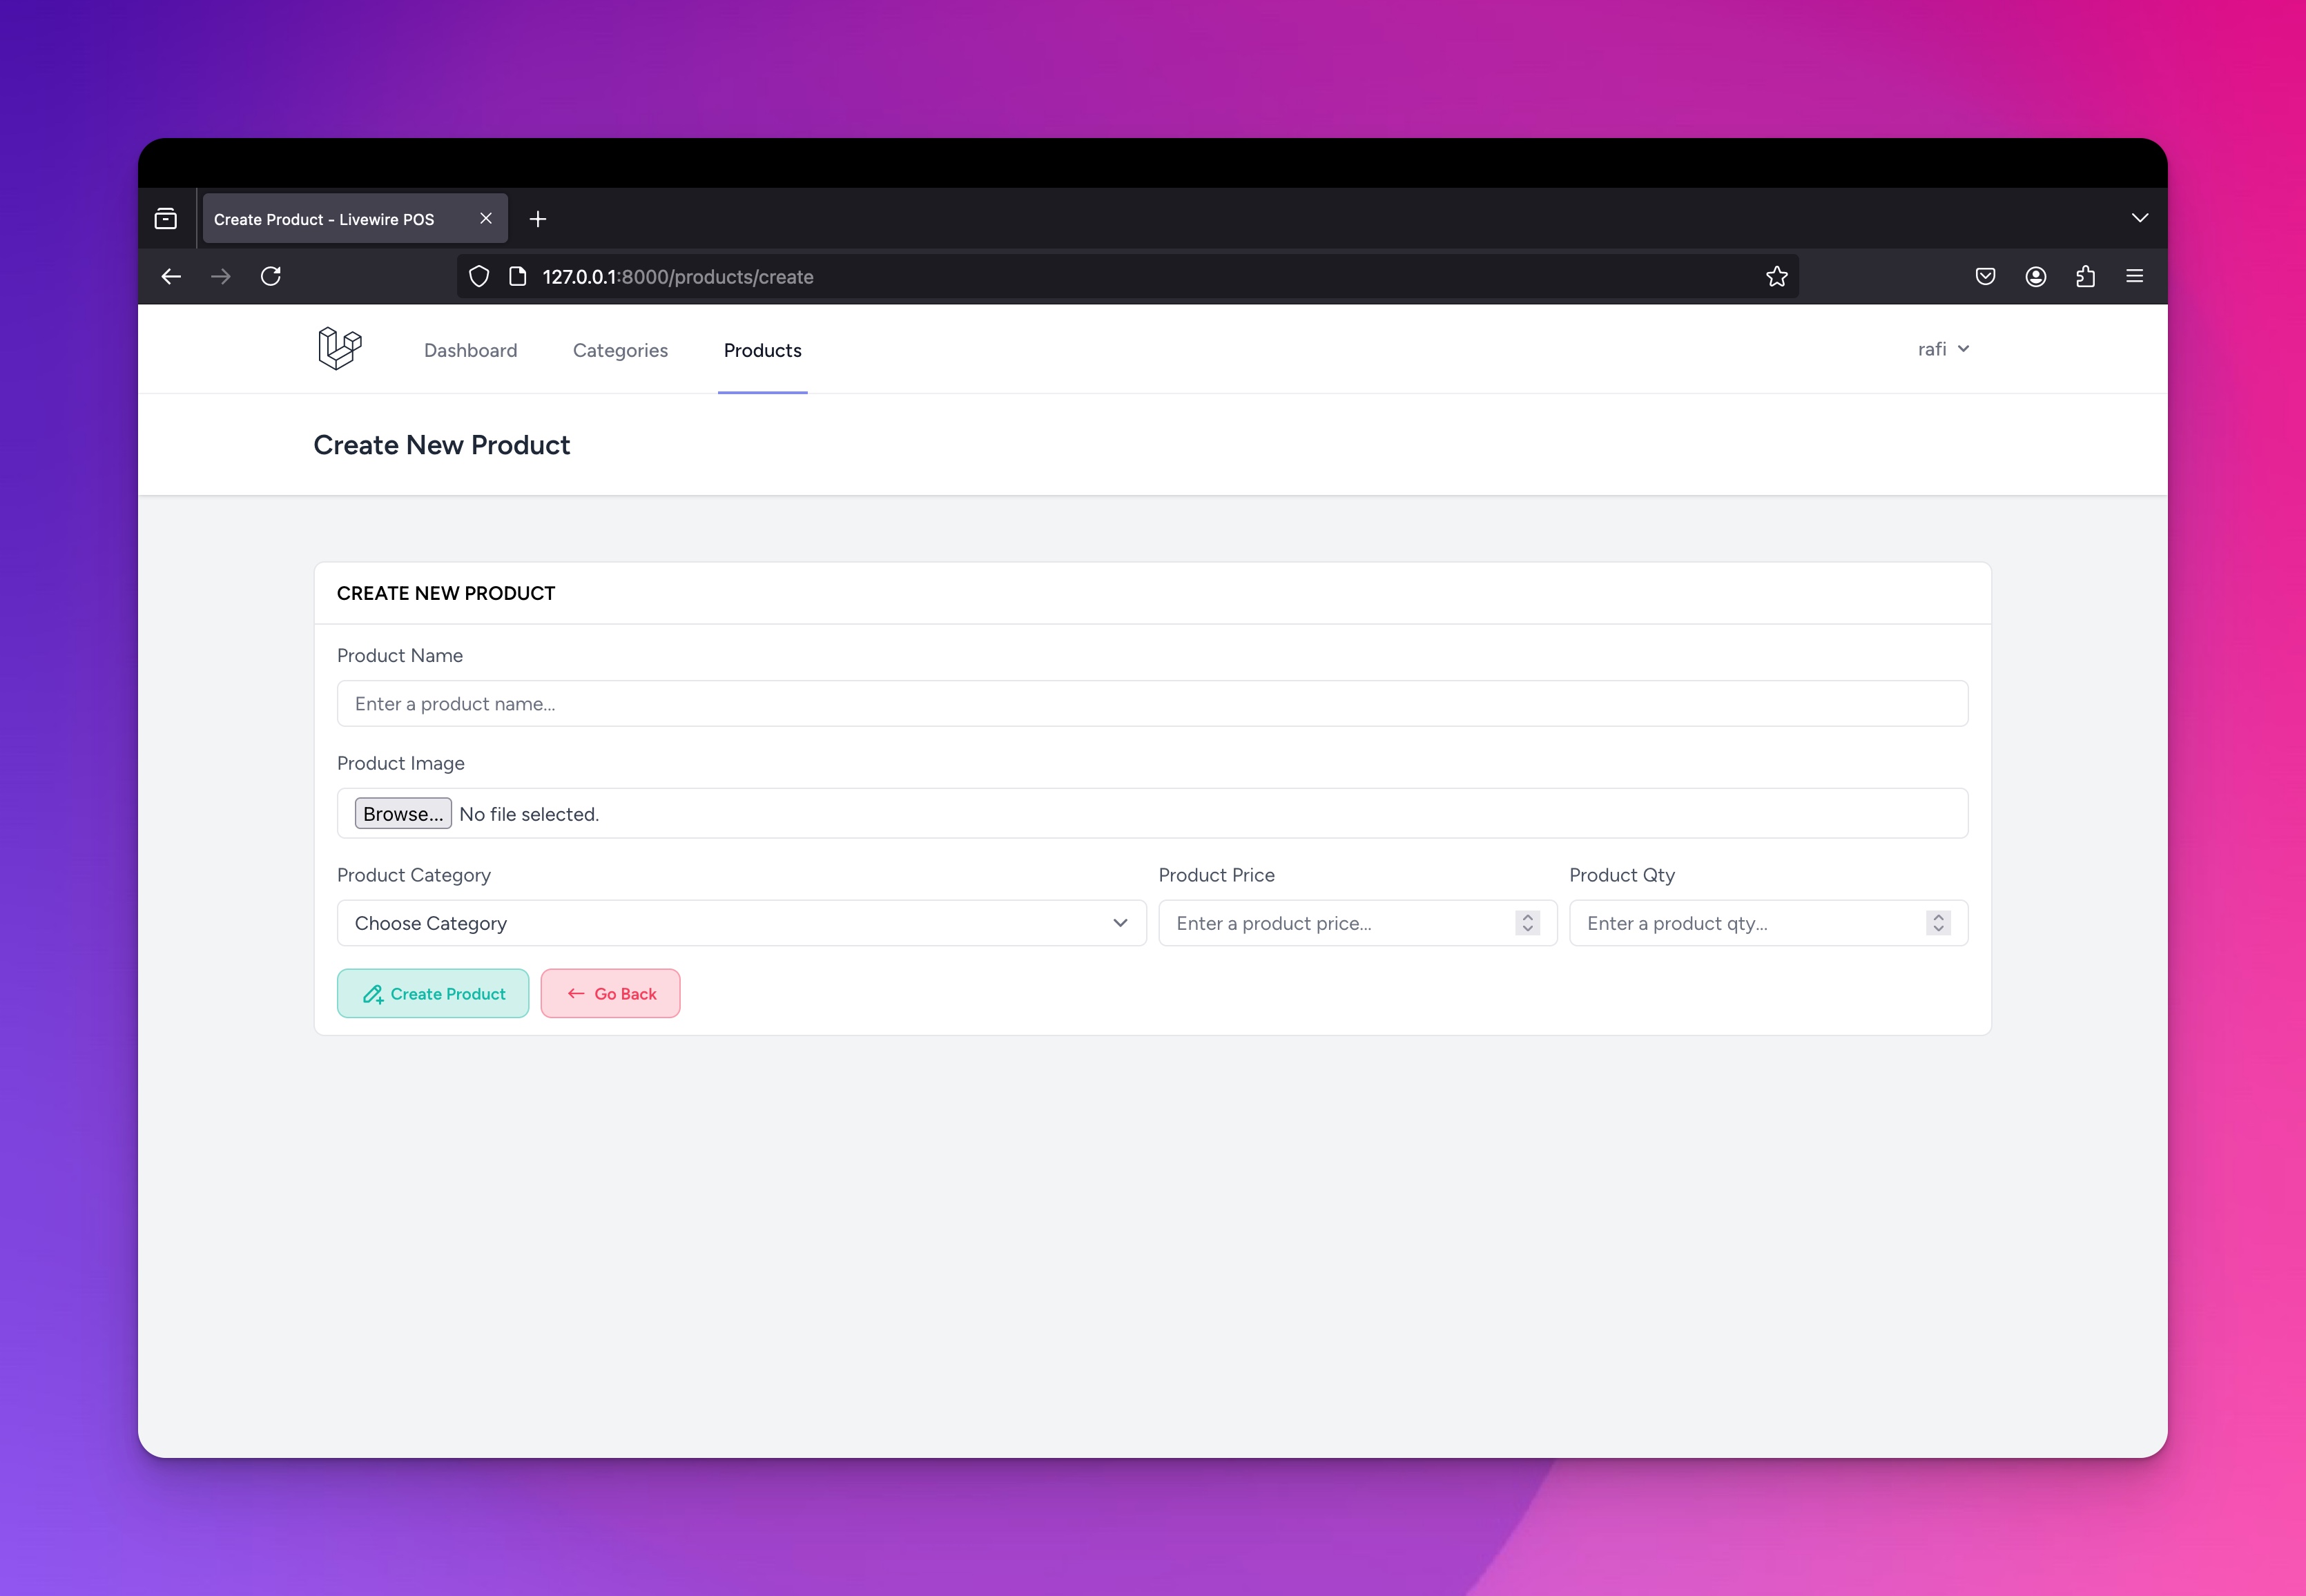
Selanjutnya kita akan melakukan sedikit update pada halaman product index silahkan teman - teman buka file index.blade.php yang terletak di dalam folder resources/views/livewire/pages/products, kemudian lakukan update pada kode berikut ini :
Products/index.blade.php
<x-button type="create" :href="route('products.create')">
Pada kode diatas, kita hanya melakukan update pada props href dengan value route dari products.create.
¶Component Product Edit
Tahap ini merupakan tahap terakhir dari pembuatan module product, disini kita akan lanjutkan untuk membuat sebuah component untuk menghandle update data product. Silahkan teman-teman buka terminal-nya, kemudian jalankan perintah berikut ini :
Terminal
php artisan make:livewire pages.products.edit
Setelah berhasil menjalankan perintah diatas, kita akan mendapatkan 2 buah file baru yang terletak di :
-
app/Livewire/Pages/Products/Edit.php
-
resources/views/pages/products/edit.blade.php
Silahkan teman-teman buka file App/Livewire/Pages/Products/Edit.php, kemudian tambahkan kode berikut ini :
Products/Edit.php
<?php

namespace App\Livewire\Pages\Products;

use App\Models\Product;
use Livewire\Component;
use App\Models\Category;
use Livewire\WithFileUploads;
use Livewire\Attributes\Title;
use Livewire\Attributes\Layout;
use Illuminate\Support\Facades\Storage;

class Edit extends Component
{
    use WithFileUploads;

    // define layout
    #[Layout('layouts.app')]
    // define title
    #[Title('Edit Product')]

    // define property
    public Product $product;
    public $path = 'public/products/';
    public $name;
    public $image;
    public $categoryId;
    public $price;
    public $qty;

    // define lifecycle hooks
    public function mount()
    {
        // assign proprty with product data
        $this->name = $this->product->name;
        $this->price = $this->product->price;
        $this->categoryId = $this->product->category_id;
        $this->qty = $this->product->quantity;
    }

    // define valdiation
    public function rules()
    {
        return [
            'name' => 'required|string|min:3|max:255|unique:products,name,'.$this->product->id,
            'image' => 'nullable|image|max:2048',
            'price' => 'required',
            'categoryId' => 'required',
            'quantity' => 'required',
        ];
    }

    // define function update
    public function update()
    {
        // call validation
        $this->validate();

        if($this->image){
            // delete old image
            Storage::disk('local')->delete($this->path.basename($this->product->image));

            // store new image
            $this->image->storeAS(path: $this->path, name: $this->image->hashName());

            // update product image
            $this->product->update([
                'image' => $this->image->hashName(),
            ]);
        }

        // update product data
        $this->product->update([
            'name' => $this->name,
            'slug' => str()->slug($this->name),
            'price' => $this->price,
            'category_id' => $this->categoryId,
            'quantity' => $this->qty,
        ]);

        // render view
        return $this->redirect('/products', navigate:true);
    }

    public function render()
    {
        // list categories data
        $categories = Category::query()
            ->select('id', 'name')
            ->orderBy('name')->get();

        return view('livewire.pages.products.edit', compact('categories'));
    }
}
Pada kode diatas pertama - tama, kita menggunakan sebuah trait yang telah disedikan oleh livewire, trait ini berfungsi sebagai upload file di livewire.
Products/Edit.php
use WithFileUploads;
Selanjutnya kita mendefinisikan sebuah attribute title dan layout.
Products/Edit.php
// define layout
#[Layout('layouts.app')]
// define title
#[Title('Edit Product')]
Kemudian kita juga mendefinisikan beberapa property diantaranya product, path, name, image, categoryId, price dan qty.
Products/Edit.php
// define property
public Product $product;
public $path = 'public/products/';
public $name;
public $image;
public $categoryId;
public $price;
public $qty;
Berikutnya kita mendefinisikan sebuah method lifecycle hook didalam livewire yaitu mount, method ini akan dijalankan ketika component pertama kali dirender.
Products/Edit.php
// define lifecycle hooks
public function mount()
{
    // assign proprty with product data
    $this->name = $this->product->name;
    $this->price = $this->product->price;
    $this->categoryId = $this->product->category_id;
    $this->qty = $this->product->quantity;
}
Pada kode diatas, kita membuat default value dari property name mengguakan data dari property category->name.
Pada kode diatas, kita mendefinisikan default value dari beberapa property yang kita miliki, diantaranya :
-
name - memiliki value dari property product->name.
-
price - memiliki value dari propery product->price.
-
categoryId - memiliki value dari property product->category_id.
-
qty - memilki value dari property product->quantity
Berikutnya kita juga mendefinisikan sebuah validasi, menggunakan method rules.
Products/Edit.php
// define valdiation
public function rules()
{
    return [
        'name' => 'required|string|min:3|max:255|unique:products,name,'.$this->product->id,
        'image' => 'nullable|image|max:2048',
        'price' => 'required',
        'categoryId' => 'required',
        'qty' => 'required',
    ];
}
Method update
Method ini kita gunakan untuk melakukan proses perubahan data tabel products kita.
Products/Edit.php
// define function update
public function update()
{
    // call validation
    $this->validate();

    if($this->image){
        // delete old image
        Storage::disk('local')->delete($this->path.basename($this->product->image));

        // store new image
        $this->image->storeAS(path: $this->path, name: $this->image->hashName());

        // update product image
        $this->product->update([
            'image' => $this->image->hashName(),
        ]);
    }

    // update product data
    $this->product->update([
        'name' => $this->name,
        'slug' => str()->slug($this->name),
        'price' => $this->price,
        'category_id' => $this->categoryId,
        'quantity' => $this->qty,
    ]);

    // render view
    return $this->redirect('/products', navigate:true);
}
Didalam method tersebut, pertama - tama kita memangil validasi yang telah kita buat sebelumnya
Products/Edit.php
// call validation
$this->validate();
kemudian kita melakukan pengecekan dari property image jika bukan null maka kita akan menghapus data gambar produk kita kemudian lakukan upload gambar ulang.
Products/Edit.php
if($this->image){
    // delete old image
    Storage::disk('local')->delete($this->path.basename($this->product->image));

    // store new image
    $this->image->storeAS(path: $this->path, name: $this->image->hashName());

    // update product image
    $this->product->update([
        'image' => $this->image->hashName(),
    ]);
}
Kemudian jika request yang kita kirimkan sudah sesuai dengan kriteria validasi yang kita definisikan, maka kita lakukan update data tabel products sesuai dengan id menggunakan method update.
Products/Edit.php
// update product data
$this->product->update([
    'name' => $this->name,
    'slug' => str()->slug($this->name),
    'price' => $this->price,
    'category_id' => $this->categoryId,
    'quantity' => $this->qty,
]);
Terakhir kita akan diarahkan ke sebuah route yang bernama products.index, disini kita memanfaat redirect dari livewire navigate true yang artinya kita akan berpindah halaman tanpa melakukan reload page.
Products/Edit.php
// render view
return $this->redirect('/products', navigate:true);
Method Render
Method ini kita gunakan untuk menampilkan sebuah halaman edit data product.
Products/Edit.php
public function render()
{
    // list categories data
    $categories = Category::query()
        ->select('id', 'name')
        ->orderBy('name')->get();

    // render view
    return view('livewire.pages.products.edit', compact('categories'));
}
Pada kode diatas, kita menampilkan seluruh data category.
Products/Edit.php
// list categories data
$categories = Category::query()
    ->select('id', 'name')
    ->orderBy('name')->get();
Selanjutnya kita lempar data category yang telah kita buat ke sebuah view dengan nama livewire.pages.products.edit.
Products/Edit.php
// render view
return view('livewire.pages.products.edit', compact('categories'));
¶Route Component Product Edit
Setelah berhasil membuat component product edit, sekarang kita akan lanjutkan untuk membuat route-nya, Silahkan teman - teman buka file routes/web.php, kemudian tambahkan kode berikut ini :
web.php
<?php

use Illuminate\Support\Facades\Route;
use App\Livewire\Pages\Categories\Index as CategoryIndex;
use App\Livewire\Pages\Categories\Create as CategoryCreate;
use App\Livewire\Pages\Categories\Edit as CategoryEdit;
use App\Livewire\Pages\Products\Index as ProductIndex;
use App\Livewire\Pages\Products\Create as ProductCreate;
use App\Livewire\Pages\Products\Edit as ProductEdit;


Route::view('/', 'welcome');

Route::group(['middleware' => ['auth']], function(){
    // categories route
    Route::group(['prefix' => 'categories', 'as' => 'categories.'], function(){
        Route::get('/', CategoryIndex::class)->name('index');
        Route::get('/create', CategoryCreate::class)->name('create');
        Route::get('/edit/{category}', CategoryEdit::class)->name('edit');
    });
    // products route
    Route::group(['prefix' => 'products', 'as' => 'products.'], function(){
        Route::get('/', ProductIndex::class)->name('index');
        Route::get('/create', ProductCreate::class)->name('create');
        Route::get('/edit/{product}', ProductEdit::class)->name('edit');
    });
});

Route::view('dashboard', 'dashboard')
    ->middleware(['auth', 'verified'])
    ->name('dashboard');

Route::view('profile', 'profile')
    ->middleware(['auth'])
    ->name('profile');

require __DIR__.'/auth.php';
Dari perubahan kode diatas, kita menambahkan sebuah route baru dengan nama products/edit/{product} jika teman-teman perhatikan pada route edit, disini kita menggunakan jenis route model binding, untuk memastikan route yang kita buat berfungsi, teman - teman bisa jalankan perintah berikut ini dalam terminal.
Terminal
php artisan r:l --name=products
Setelah perintah artisan diatas berhasil dijalankan maka kita akan mendapatkan output, kurang lebih seperti berikut ini.
Terminal
GET|HEAD       products .......................................... products.index › App\Livewire\Pages\Products\Index
GET|HEAD       products/create ................................. products.create › App\Livewire\Pages\Products\Create
GET|HEAD       products/edit/{product} ............................. products.edit › App\Livewire\Pages\Products\Edit
¶View Component Product Edit
Setelah berhasil membuat route untuk perubahan data product, disini akan kita lanjutkan untuk pembuatan view ubaw data product. silahkan teman - teman buka file yang bernama edit.blade.php yang terletak di resources/views/livewire/pages/products, kemudian tambahkan kode berikut ini :
edit.blade.php
<div>
    <x-slot name="header">
        <h2 class="font-semibold text-xl text-gray-800 leading-tight">
            {{ __('Edit Product') }}
        </h2>
    </x-slot>

    <div class="py-12 px-4">
        <div class="max-w-7xl mx-auto sm:px-6 lg:px-8">
            <x-card title="Edit Product">
                <form wire:submit.prevent="update">
                    <div class="mb-4">
                        <x-input type="text" label="Product Name" name="name" :value="old('name')" placeholder="Enter a product name..."/>
                    </div>
                    <div class="mb-4">
                        <x-input label="Product Image" type="file" name="image"/>
                    </div>
                    <div class="flex flex-col md:flex-row items-center gap-2 mb-4">
                        <div class="w-full md:w-1/2">
                            <x-select label="Product Category" name="categoryId">
                                    <option>Choose Category</option>
                                @foreach ($categories as $category)
                                    <option value="{{ $category->id }}">{{ $category->name }}</option>
                                @endforeach
                            </x-select>
                        </div>
                        <div class="w-full md:w-1/2">
                            <div class="flex flex-col md:flex-row items-center gap-2">
                                <div class="w-full md:w-1/2">
                                    <x-input type="number" label="Product Price" name="price" :value="old('price')" placeholder="Enter a product price..."/>
                                </div>
                                <div class="w-full md:w-1/2">
                                    <x-input type="number" label="Product Qty" name="qty" :value="old('qty')" placeholder="Enter a product qty..."/>
                                </div>
                            </div>
                        </div>
                    </div>
                    <div class="flex items-center gap-2">
                        <x-button type="submit" title="Update Product"/>
                        <x-button type="cancel" title="Go Back" :href="route('products.index')"/>
                    </div>
                </form>
            </x-card>
        </div>
    </div>
</div>
Pada kode diatas, kita melakukan pemanggilan beberapa components yang telah kita buat sebelumnya diantaranya :
-
<x-card/> - props yang digunakan title
-
<x-button/> - props yang digunakan type, href dan title.
-
<x-input/> - props yang digunakan type, label, name, value dan placeholder.
-
<x-select/> - props yang digunakan label dan name.
Pada bagian form action kita menggunakan attribute yang disediakan oleh livewire yaitu wire:submit.prevent kemudian kita set valuenya dengan method update yang telah kita buat sebelumnya.
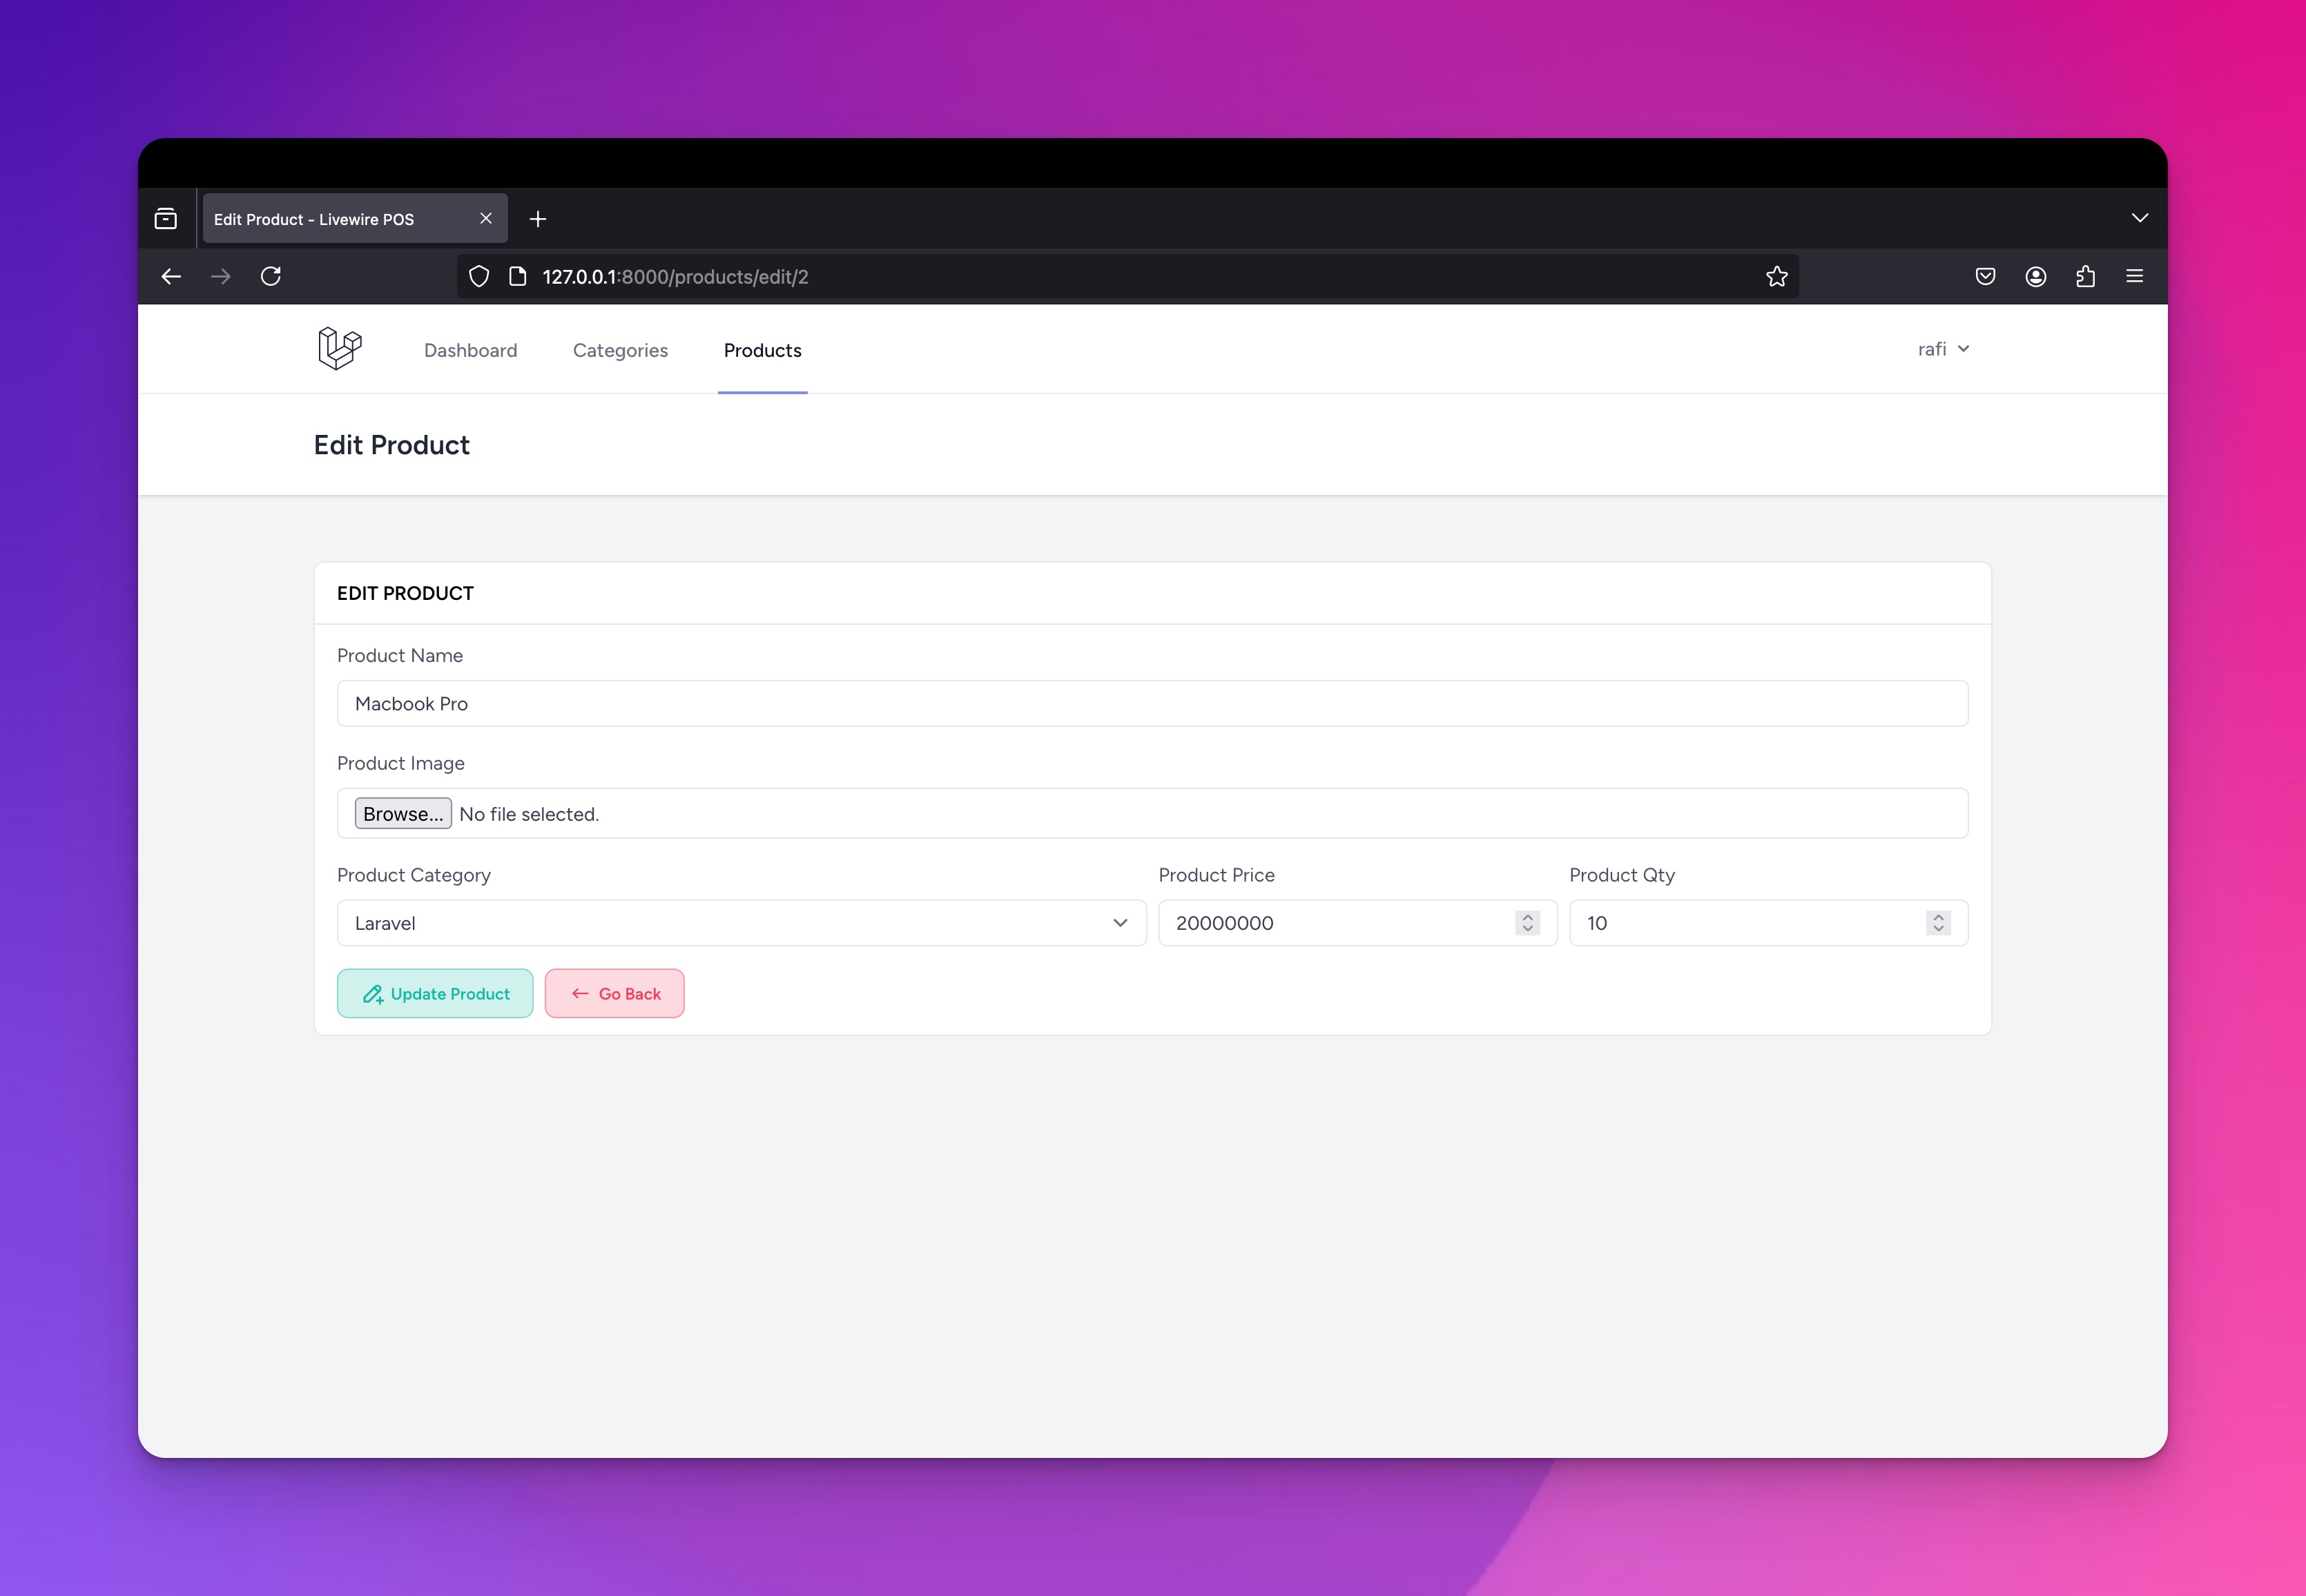
Selanjutnya kita akan melakukan sedikit update pada halaman product index , silahkan teman - teman buka file index.blade.php yang terletak di dalam folder resources/views/livewire/pages/products, kemudian lakukan update pada kode berikut ini :
Categories/index.blade.php
<x-button type="edit" title="Edit" :href="route('products.edit', $product->id)"/>
Pada kode diatas, kita hanya melakukan update props href dengan value route dari products.edit.
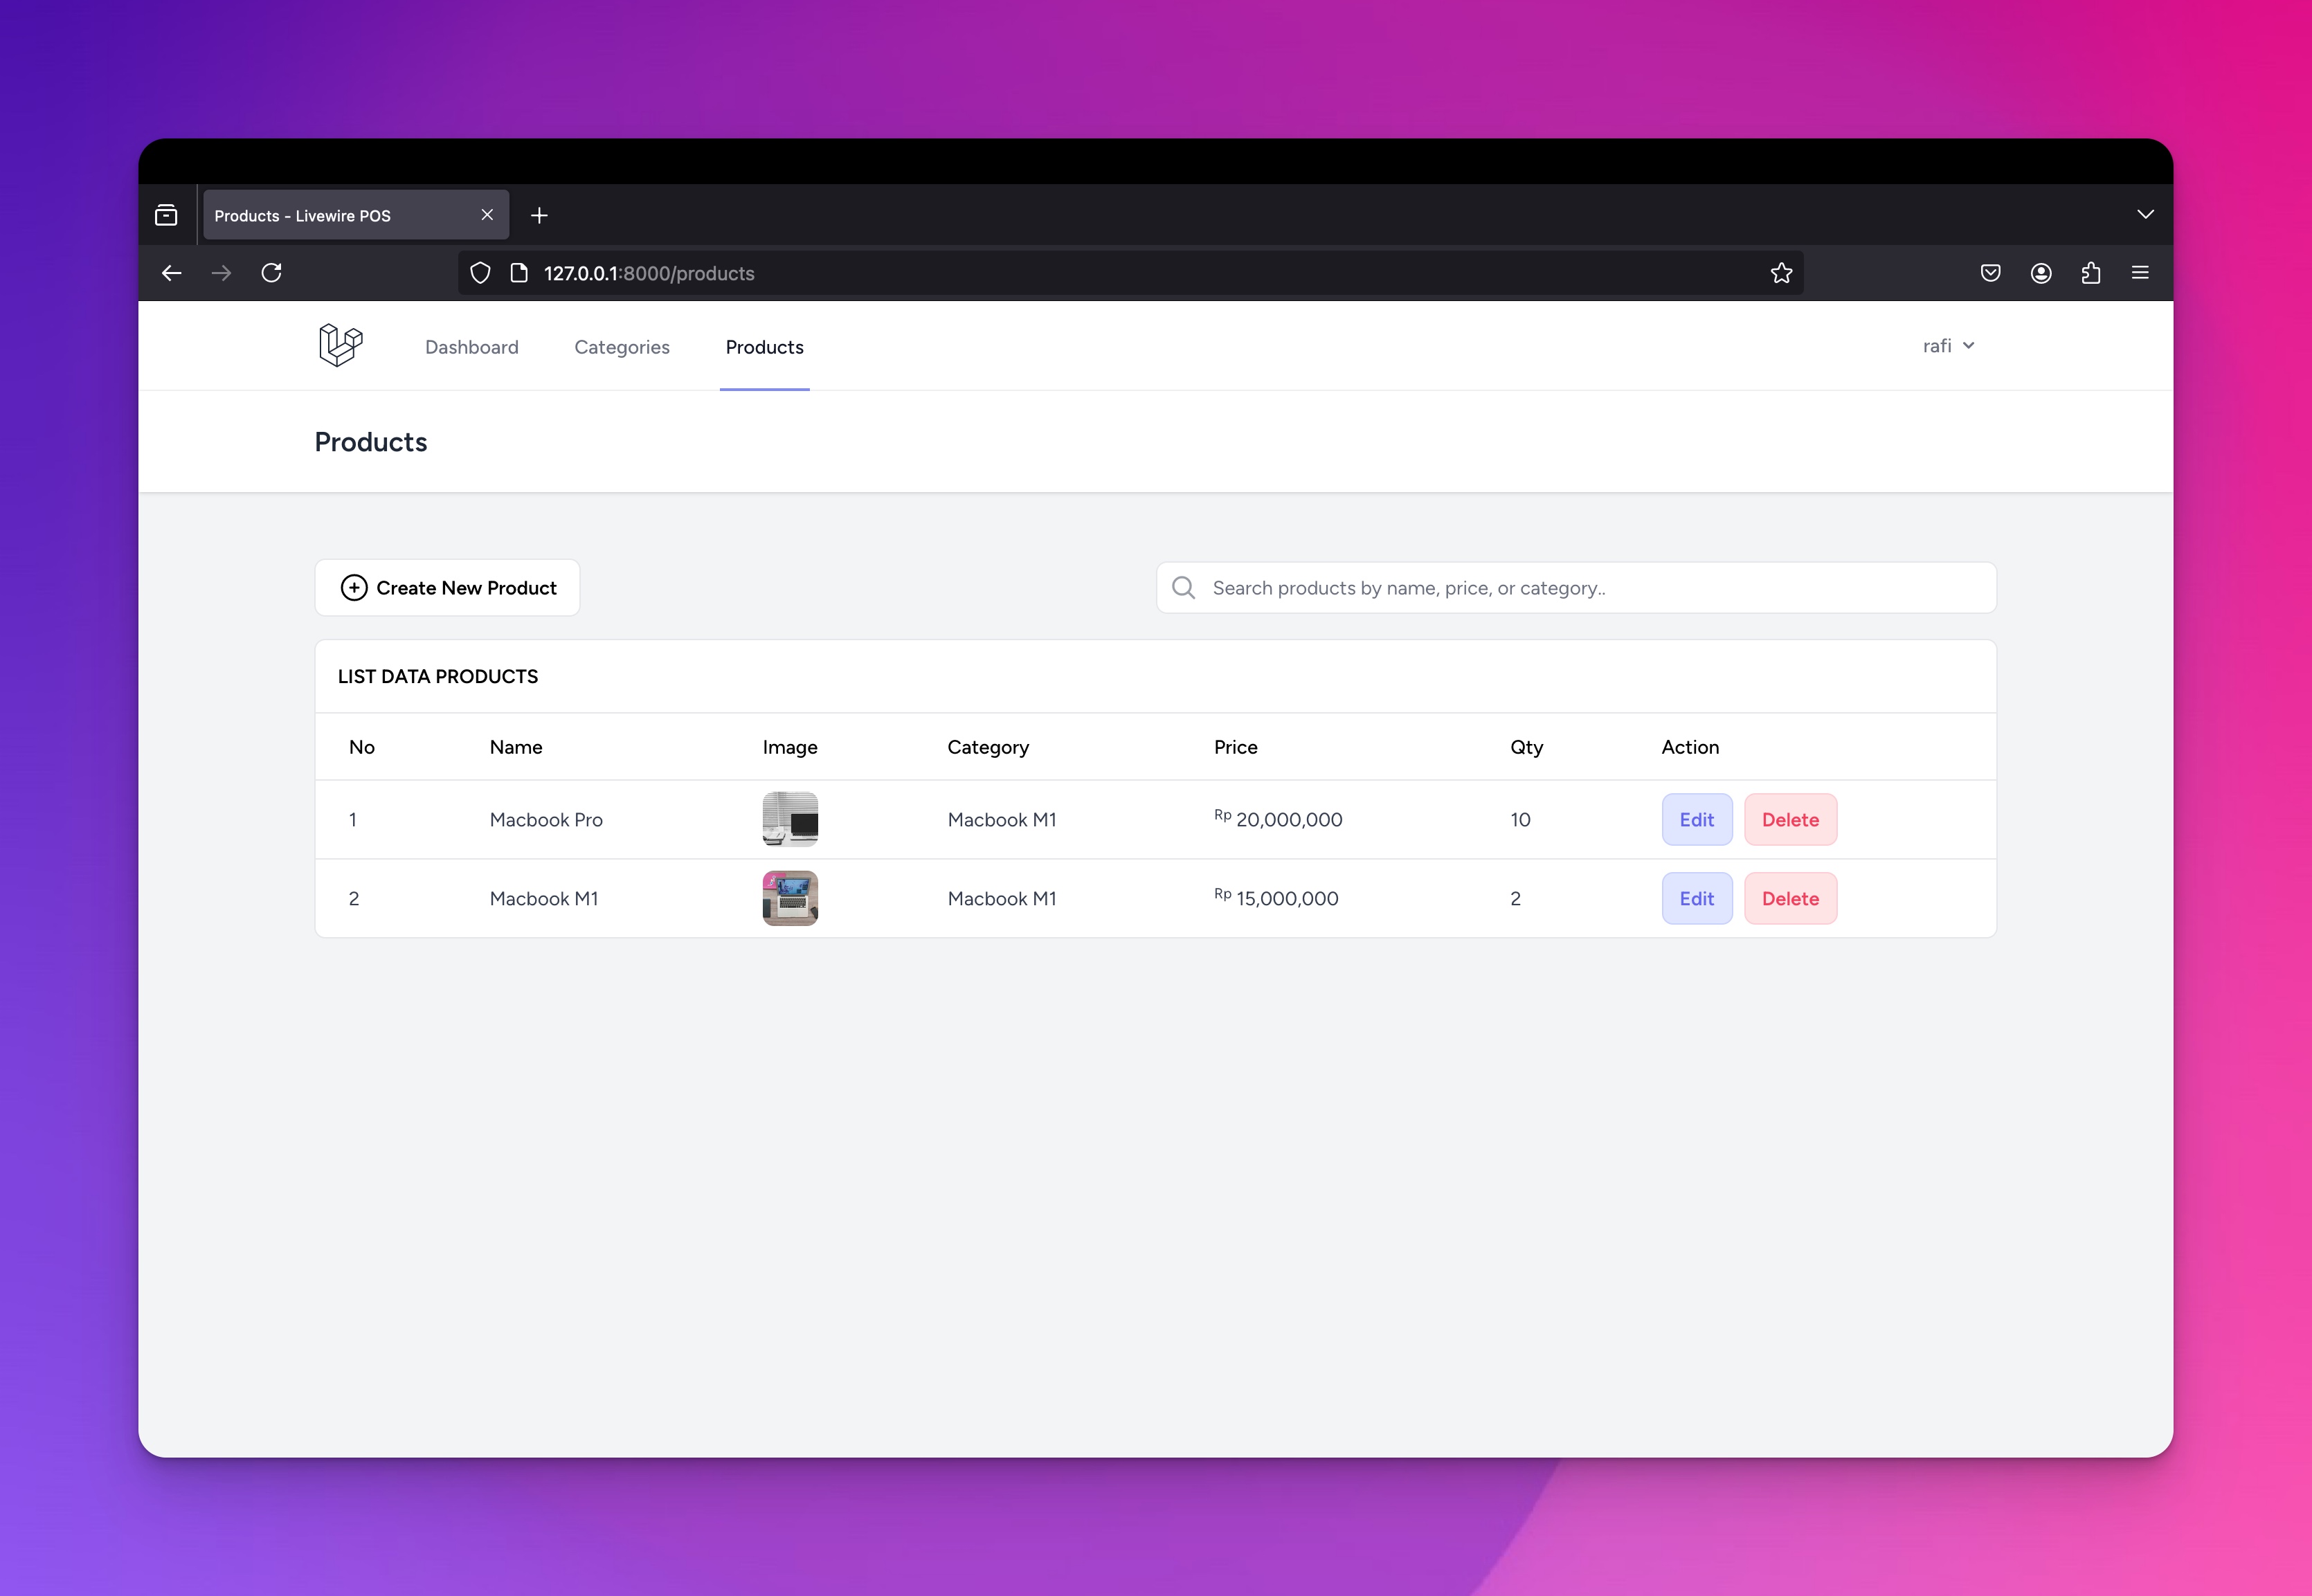
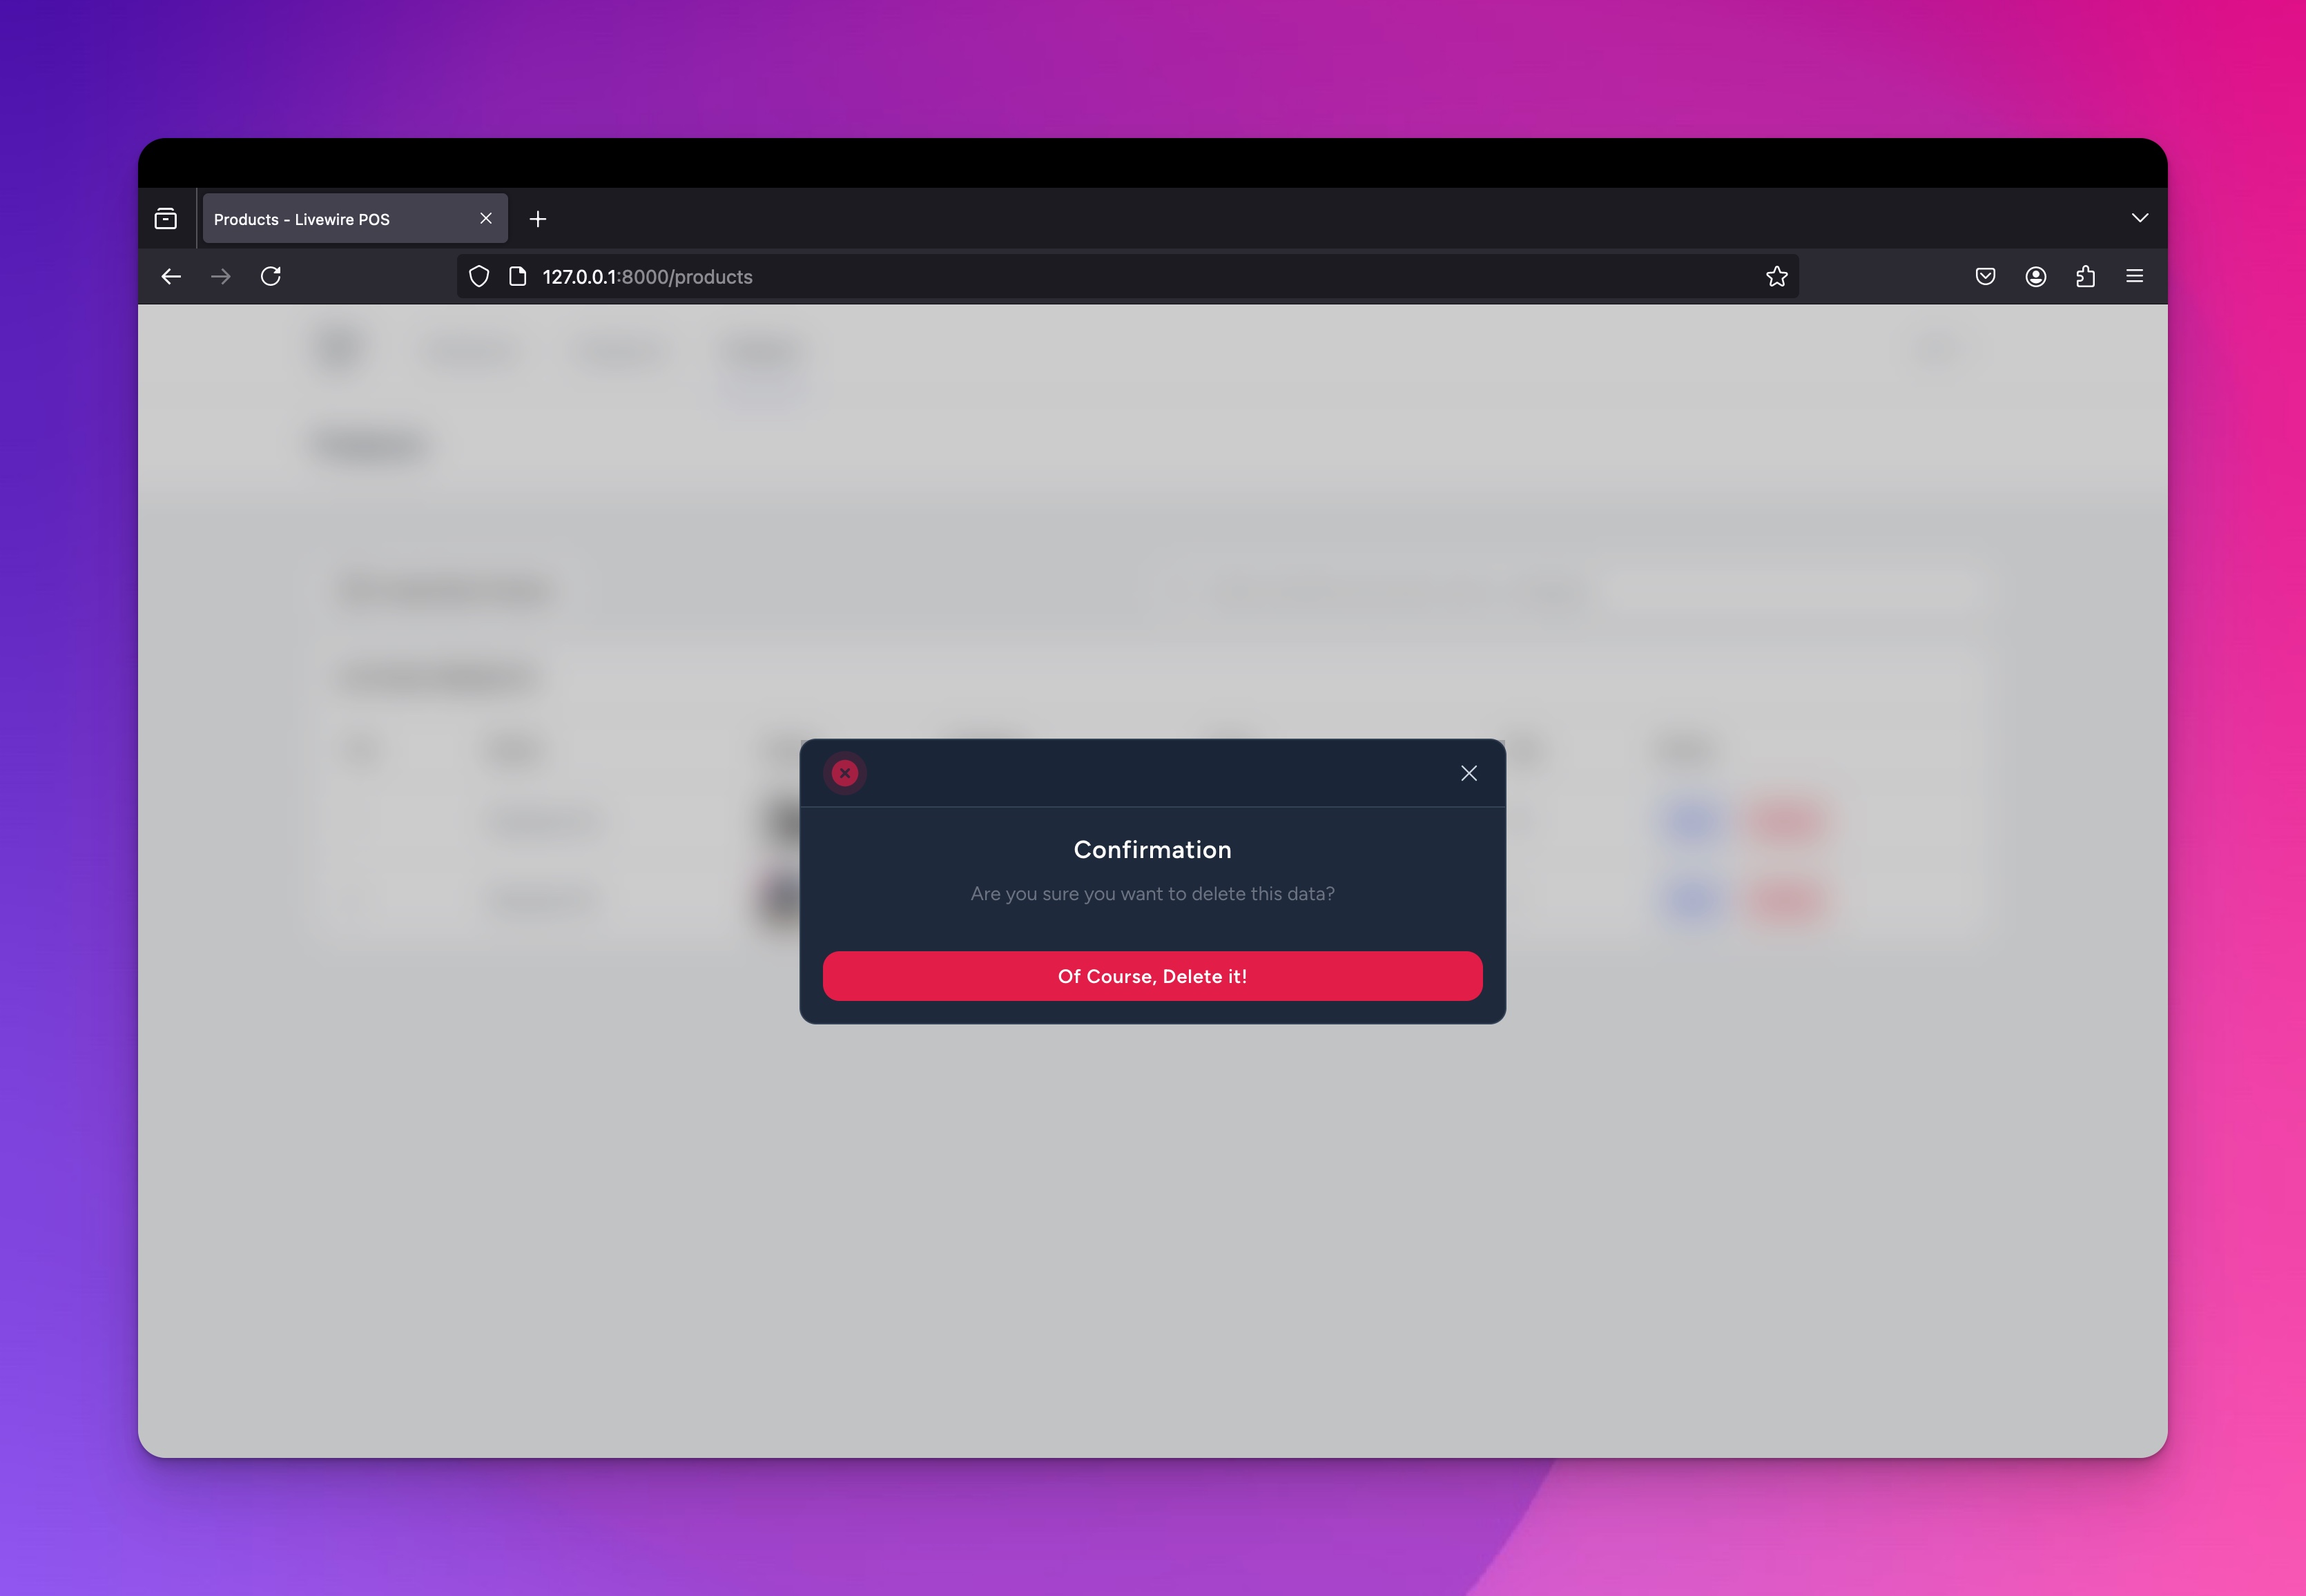
¶Screenshoot Hasil


¶Penutup
Pada artikel kali ini kita telah berhasil menyelesaikan pembuatan module product, selanjutnya kita akan lanjutkan untuk pembuatan module pos atau module transaksi.


